If you know how to download and install software, skip to
this section:
Configuring & Using mIRC. mIRC is
a PC shareware program which has a 30 day free trial period.
Downloading & Installing mIRC
1. Go to the following website:
http://www.mirc.com/get.html to download the chat client.
Note: Please return to this tutorial for installation instructions
and connecting to your online course chatroom.
2. If you use Windows 98, Windows 2000 or Windows NT, select the 32
bit option from the list. The list is in alphabetical order by state,
just click on the name of your state.
3. A "File Download" box will appear. Click "Save this program to
disk" option, then click OK.
4. Change the filename to "mirc" and save this file to your desktop.
When the download is complete, click "Close".
5. Once the file is downloaded, you can install it on your PC. Before
installing the program, close all applications that may be running.
6. Double-click the "mirc.exe" icon on your desktop to begin the
installation.
7. The installation will show a welcome screen. Click "Next".
8. Click "Yes" to accept the license agreement.
9. You will see another window that will ask you where you wish to
install the mIRC program. The default settings will install it to
c:\mirc. If you wish to install it somewhere else, click browse to
select an alternate location.
10. Click install to start the installation process.
11. When completed, you will see a message saying "mIRC installation
was successful". Click "Finish".
Configuring & Using mIRC
1. Double-click on the mIRC icon on your desktop.
2. The mIRC program opens. First, you will see "about mIRC" box. Click
the x in the top right hand corner to close it. You will be left with the
"mIRC Options" box, click "Add"

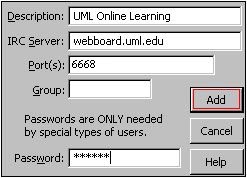
3. You will see an "mIRC Add Server" window. Add the information to
the fields as shown below. In the password field enter your online
course password. Click "Add" when finished.
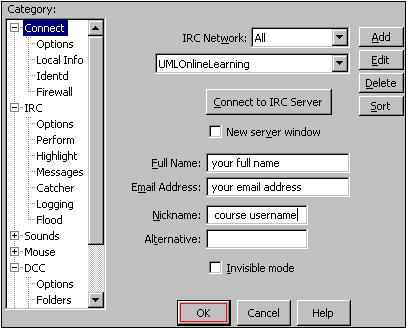
4. The "mIRC Options" box will now show UML Online Learning in the
description field. Fill in the "Full Name" and "E-Mail Address" fields
with your personal information. In the nickname field, enter your online
course username. Click OK when finished.
5. From the menu bar, click the connect button (shown below) or go
under File and select "Connect".

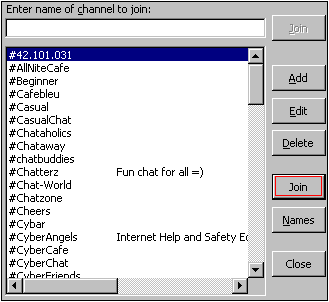
6. You will see mIRC channel folder window, click "Add"
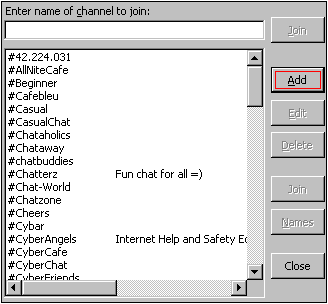
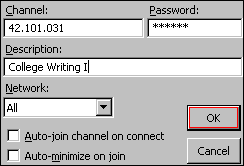
7. A new window will pop-up, enter the information as follows:
- Enter your course number and section in the "channel" field (ex:
42.101.031)
- Enter your online course password in the "password" field.
- Enter your course name in description if desired.
Click OK when finished.
8. You will see the course number that you just added highlighted,
click "join" button to enter course chatroom.
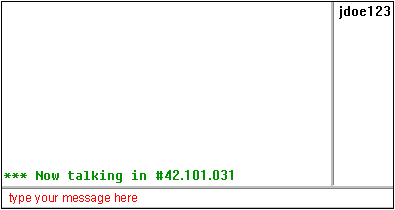
9. To begin, start typing in the box at the bottom of the screen
where you see the flashing cursor. Hit "Enter" on your keyboard, to send
message. To quit chat, from the file menu go under "File" and select
"Disconnect".
To connect to your online course chat using mIRC after the first time
setup, follow these steps:
1. Find the mIRC icon using the File Manager or Windows Explorer.
Double-click the mIRC icon.
2. If an "About mIRC" window appears, close it.
3. The "mIRC Options" window will appear. Make sure "UML Online
Learning" appears in the description field. Click OK.
4. When the "mIRC Channels Folder" window comes up, click on your course
number in the list and click "Join".