Microsoft Word includes features that allow you to track the
changes made by multiple users, as well as a review function that allows
reviewers to insert their comments within a document. These features are
very useful when you are part of a peer group assigned to work on a
project together. They also provide a means for instructors to comment on
your work. It allows a peer editor or the instructor to keep track of the
comments and changes made by various reviewers.
Please note that tracking and reviewing features may
vary between different versions of Word. For additional help with your specific version of Microsoft Word, we recommend you visit the
Microsoft Office Word support site.
Conventions for Tutorial
Some of the steps included here require the use of the menu bar.
However, most of the procedures mentioned in this tutorial involve
commands that are included on the Reviewing toolbar. To add the Reviewing
toolbar:
- Click on the View menu.
- Choose the Toolbar submenu.
- Click on Reviewing. The Reviewing toolbar should appear, as shown below.

Note: The directions in this tutorial are intended for the PC only.
What Do You Want To Do?
Beginning Your Document
If you want to set up a document for a peer editor or an instructor to
review after you've completed it, you must prepare your document for
review. By enabling the Protect Document feature, any changes or comments
made by those who will be reviewing your document will be marked within
the document. After creating a document, you can enable the Protect
Document feature:
- Open the document to be reviewed.
- In the Tools menu, click Protect Document.
- Select one of the following options as appropriate for your project:
- Select Tracked Changes to allow other team members to change the document by inserting comments and tracked changes.
- Click Comments to allow other team members to only add their comments.
- Type an optional password to allow only authorized reviewers to add comments and changes.
Tracking Changes While You Edit
If you are a peer editor or an instructor who is going to revise a
document that has not been prepared for review, you must first enable the
Track Changes feature. This will ensure that any changes or comments that
you add are tracked by Word.
- Open the document you want to revise.
- Click the Track Changes icon
 .
.
- Begin editing the document, adding and deleting text as necessary.
If you prefer, you can use the menu to track changes:
- Open the document you want to revise.
- Click on the Tools menu.
- Click on Track Changes.
- Begin editing the document, adding or deleting text as necessary.
A major difference in the Track changes feature for Word is that changes
and comments within a document will appear differently depending
on which view you choose from the View menu. Because of this, it is
important to note the view that has been chosen from the View menu.
If you have chosen the Normal view, added text will appear in a color
unique to that particular user and be underscored. Deleted text will
appear in color and with a strike-through.
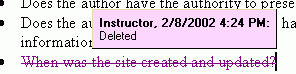
When a user rests the mouse on a change, a ScreenTip appears that
contains the reviewer's or editor's name, the date and time the change was
made, and the type of change (for example, Inserted.). Below is an example
of what the ScreenTip looks like.
Word automatically assigns unique colors to the first eight reviewers
of a document. Word distinguishes among the different users according to
the User Information tab. Usually, your name is automatically entered when
the Word application is installed on your computer. To confirm that the
information provided there is correct, follow these steps:
- From the Tools menu, select Options.
- Click on the User Information tab.
- Ensure that the information is correct and click OK.
If you have chosen the Web Layout or Print Layout view from the View
menu, added text will be underscored and in a unique color. Deleted text
will be indicated by a small arrow and a broken line that leads to a
balloon containing the text that has been deleted. Below is an example of
what deleted text looks like in the Web Layout or Print Layout view.

Another way to display the marked up text is to use the Show menu that
appears on the Reviewing toolbar. By clicking on Show, you can choose to
display comments, insertions and deletions, and formatting. Again, this
feature allows you to control which types of changes you want to view.
The are four views or versions of marked up text. They are:
- Original, which displays the document with all changes rejected
- Original Showing Markup, which displays inserted text as balloons and deleted text as underscored
- Final, which displays the document as it would appear with all the changes accepted
- Final Showing Markup, which displays the marked up deleted text in balloons and inserted text as underscored
Another way to view your markup changes is to click on View and select
Markup. This technique also allows you to display balloons and
underscoring.
If you have received a document from someone else and want to make
annotations or review comments within the document that do not change the
text, you can add in review comments. Review comments can appear in one of
two ways, depending on the layout view you have chosen.
To add a review comment:
- Put your mouse on the text for which you want to insert a comment.
-
Using the Reviewing toolbar, click on the insert comment
 icon and begin typing your comment. Word will insert brackets in a unique color and create a
balloon "call out" in which you type in your comments.
icon and begin typing your comment. Word will insert brackets in a unique color and create a
balloon "call out" in which you type in your comments.
- Type your comment.
If you prefer to use the menu bar:
- Put your mouse on the text for which you want to insert a comment.
- From the Insert menu, click on Comment.
- Type your comment.
As with the revision marks, Word uses a different color for each user to distinguish among their comments.
When the user scrolls over the comment balloon, a ScreenTip appears
that contains the commenter's name and the date and time the comment was
made, just as occurs when tracking changes in a document.
You can also see all the changes made to the document in one long list
by activating the Reviewing pane. This feature can be activated by
clicking on the Reviewing Pane icon  on the Reviewing toolbar.
If you wish, you can insert a voice comment as a sound object with the
document. (This type of comment cannot be created without a sound card and
microphone.) To do this, click on the arrow to the right of the Insert
Comment icon. From the dropdown menu, choose Voice Comment. A Sound object
box will appear. Click on the red dot to begin recording your voice
comment.
Multiple comments can be added for the same text. Highlight the text
again and the colored brackets still appear. Click on New Comment and
repeat the steps for adding a review comment. Another balloon with
additional comments will branch off from the same text.
You can choose to accept or reject changes or you can delete comments
made by your peer editor or instructor. To do this, you must first ensure
that you are able to view the comments and marked up changes. To view all
changes and comments from the View menu, click on Markup.
You can then review each item separately, accept all changes at once,
or delete comments and reject changes all at once.
To review each item in sequence, click on the Next icon  .
This action will highlight the next change or comment. At this point, you
can reject or accept a change or delete a comment.
.
This action will highlight the next change or comment. At this point, you
can reject or accept a change or delete a comment.
To accept each change individually, click on the small down arrow that
indicates where a change has been made. Clicking on the down arrow will
cause the dashed line that displays the type of change made to become
solid and bold. To accept the change, click on the Accept Change icon  .
This action incorporates the change into the document; it is no longer a
marked change.
.
This action incorporates the change into the document; it is no longer a
marked change.
To reject each change individually, click on the change as described
above. Next, click on the Reject Change/Delete Comment icon  .
This step will delete the change and revert that particular bit of text to
the original version.
.
This step will delete the change and revert that particular bit of text to
the original version.
To delete a comment, click anywhere within the colored brackets and
click on the Reject Change/Delete Comment icon. This step will delete the
comment and it will no longer appear in the document.
If you prefer, you can also print the review comments with the document. To
do this, make sure that you have chosen Print Layout from the View menu.
Make sure the comments and track changes are displaying in the format that you
want them to display in your printed document. On the file menu, click Print.
Under the Print what list, choose Document showing markup, then click OK. This
procedure will ensure that the document prints any tracked changes or comments
in your document.
Comparing and Merging Documents
If you have begun to make changes to a document and forgot to prepare
it to track your changes, you can still record the changes that you made
using the Compare and Merge Documents command. Or, if a reviewer working
on your document has edited it without tracking the changes, you can
compare the edited document with your original to see what changes were
made.
- Locate and open the document that contains the changes that weren't tracked.
- On the Tools menu, select Compare and Merge Documents. The Compare and Merge Documents dialog box appears.
- Open the original document (or the document with which you want to compare changes).
-
Click the Merge down arrow, and then click Merge into current document if you want to add the changes into this document. By
performing this step, deletions and changes from the document will be displayed in the current document. If you want to merge
the changes into a new document, click on Merge into new document. As it implies, this step will create a new document in
which all the changes and deletions are marked up.
You can reject or accept changes in this merged document as explained previously.